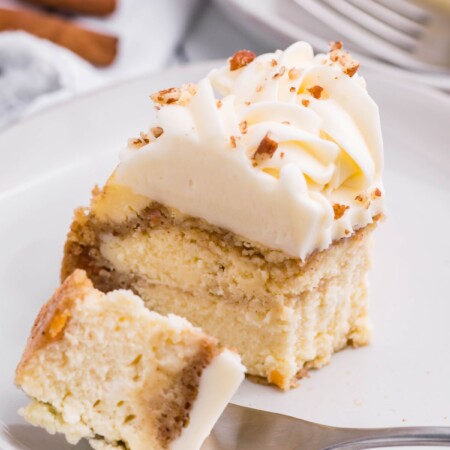
Instant Pot Carrot Cake Cheesecake
Two classics come together to create the ultimate springtime dessert! This Instant Pot Carrot Cake Cheesecake starts with a creamy cheesecake, swirled with homemade carrot cake, and topped with a cream cheese topping! I mean, what’s not to love??
Ingredients
Cheesecake
- 16 oz. cream cheese room temperature
- 1/2 cup granulated sugar
- 2 tablespoons flour
- 1 teaspoon vanilla extract
- 1/4 cup heavy whipping cream
- 2 large eggs
Carrot Cake
- 1/2 cup + 2 tablespoons flour
- 1/4 teaspoon baking soda
- 1/4 teaspoon baking powder
- 1/4 teaspoon salt
- 1/2 teaspoon ground cinnamon
- 1/4 teaspoon ground nutmeg
- 1/4 cup vegetable oil
- 2 tablespoons applesauce
- 1/4 cup granulated sugar
- 1/4 cup brown sugar packed
- 1 large egg
- 1 teaspoon vanilla extract
- 1/2 cup carrots finely grated
Topping
- 2 oz. cream cheese room temperature
- 1 tablespoon butter softened
- 1 cup powdered sugar
- 1 teaspoon vanilla extract
Instructions
Cheesecake:
- Prepare a 7-inch springform pan by spraying generously with nonstick spray and add a round of parchment paper in the bottom.
- In the bowl of a stand mixer, cream the cream cheese for 4-5 minutes until completely smooth and fluffy. Scrape the sides and bottom of the bowl then add in the sugar and flour. Mix until just combined.
- Mix in the granulated sugar, flour, and vanilla. Mix until just combined. Scrape the sides and bottom of the bowl.
- Slowly pour in the heavy whipping cream. Mix on low speed until combined and then slowly increase speed to high for 1-2 minutes. Scrape the sides and bottom of the bowl and make sure all of the ingredients are combined and smooth.
- Add the eggs in one at a time and mix until JUST combined. Be careful not to over mix the eggs.
Carrot Cake:
- Prepare the carrot cake batter by adding the flour, baking soda, baking powder, salt, cinnamon, and nutmeg into a medium bowl and whisk to combine. Set aside.
- In the bowl of a stand mixer equipped with a whisk attachment, add the vegetable oil, applesauce, granulated sugar, brown sugar, egg, and vanilla. Whisk until combined and lighter in color.
- Add the dry ingredients into the wet and mix until there are no dry spots remaining. Fold in the shredded carrots with a spatula until evenly distributed throughout the batter.
- Pour about ⅓ of the cake batter into the bottom of the springform pan and smooth. Use a large spoon to dollop about ⅓ of the cream cheese mixture on top, do not swirl. Continue with two more layers ending with the cake batter.
- Cover the springform completely in aluminum foil and make sure to seal around the top edges of the pan as best as you can to keep any extra moisture out.
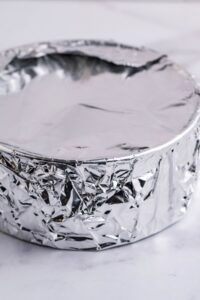
- Add about 1 cup of water and a trivet to the inner pot of your Instant Pot and place the cheesecake on the trivet. Seal the lid and set on high manual pressure for 60 minutes with a 10 minute natural release.
- Once you can open the Instant Pot, remove the cheesecake and remove the aluminum foil and allow the cheesecake to cool to room temperature. Once it has cooled, transfer to the refrigerator to set overnight, or at least 6 hours.
Topping
- Once the cheesecake is set, Run hot water around the OUTSIDE of the springform, being careful not to get water on the cheesecake. This will help release the cake from the sides. Remove the outer spring and transfer to a serving plate if desired.
- make the topping by combining all ingredients into a small mixing bowl and whisk using a hand mixer until light and fluffy. About 5 minutes.
- Add frosting onto the top of the cheesecake and smooth evenly.
- If you wish to pipe a border on the cheesecake, double the recipe above, add the remaining frosting into a pastry bag fitted with a large star tip and frost a border along the top of the cheesecake
- Serve immediately or keep in an airtight container in the refrigerator for up to three days.
Equipment
Did you make this recipe?
Make sure to follow on Pinterest for more recipes!