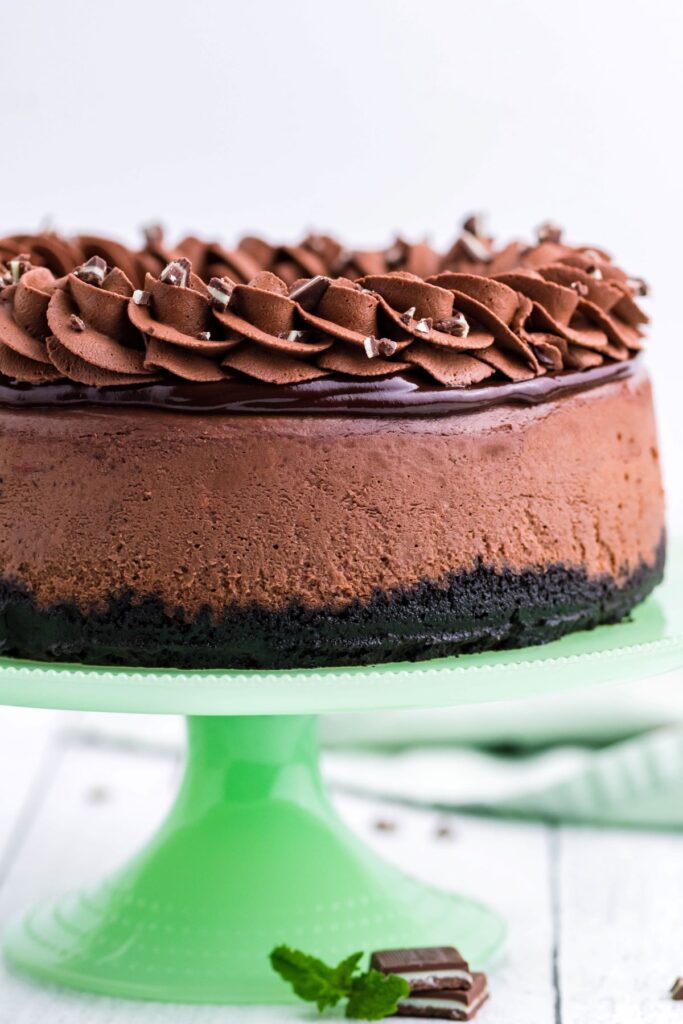
This Instant Pot Chocolate Mint Cheesecake has the perfect balance of chocolate and mint flavors. My favorite chocolate cheesecake recipe with just a hint of mint flavor baked on an Oreo crust. This cheesecake is a mint chocolate lovers dream!

INGREDIENTS
For the crust
- 1 1/4 cups Oreo cookie crumbs
- 3 tablespoons butter, melted
For the cheesecake
- 24 oz. cream cheese, softened
- ¾ cup granulated sugar
- 3 tablespoons flour
- ⅓ cup unsweetened cocoa powder
- 6 oz. semi-sweet chocolate, melted
- 1 teaspoon mint extract
- ½ cup heavy whipping cream
- 2 large eggs
For the topping
Ganache:
1/2 cup semi-sweet chocolate
1/4 cup heavy whipping cream
Whipped Cream:
1 cup heavy whipping cream, cold
1/2 cup powdered sugar
1/3 cup unsweetened cocoa powder
1 teaspoon vanilla extract
HOW TO MAKE AN INSTANT POT MINT CHOCOLATE CHEESECAKE
STEP ONE: Preheat your oven to 350 degrees F. and prepare a 7-inch springform pan by spraying generously with nonstick spray and add a round of parchment paper in the bottom.
NOTE: You CAN use another size pan, however remember that the cook time may be different. If you go larger I would recommend reducing the time, and smaller increasing the time of about 5 minutes. If you need recommendations, I HIGHLY recommend this springform.
STEP TWO: Add the Oreo cookies (whole) into a food processor and pulse until you have a fine crumb. Add the melted butter and pulse until combined. Press the crumbs into the bottom of the prepared springform to form the crust. Bake for 10 minutes then remove to a wire rack to cool completely.
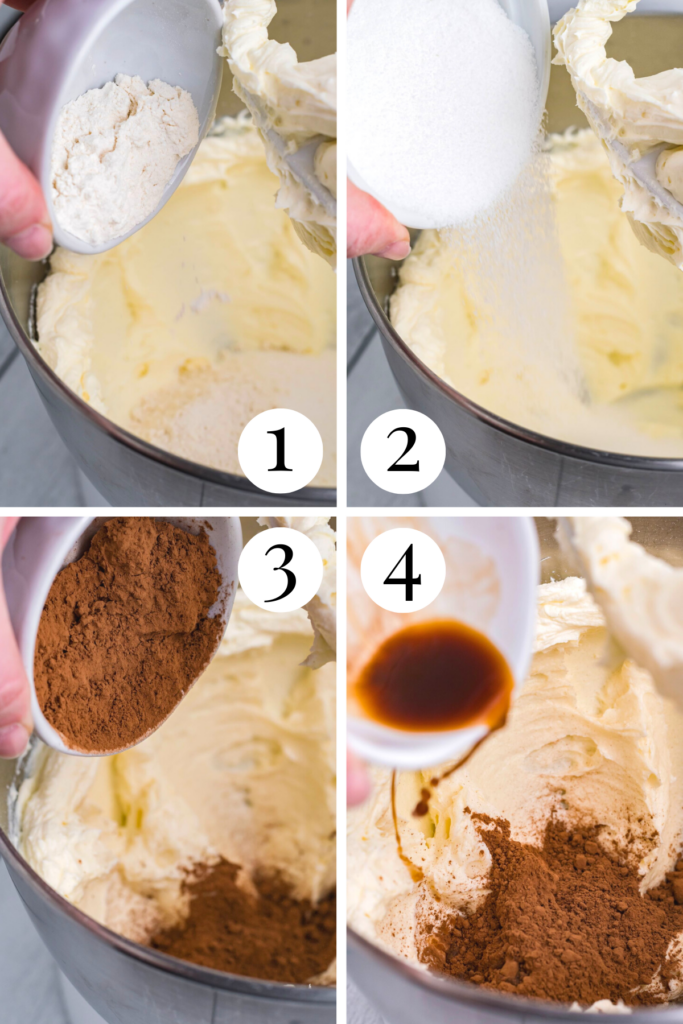
STEP THREE: In the bowl of a stand mixer, cream the cream cheese for 4-5 minutes until completely smooth and fluffy. Scrape the sides and bottom of the bowl then add in the sugar and flour. Mix until just combined.
STEP FOUR: Add in the cocoa powder and mix until just combined.
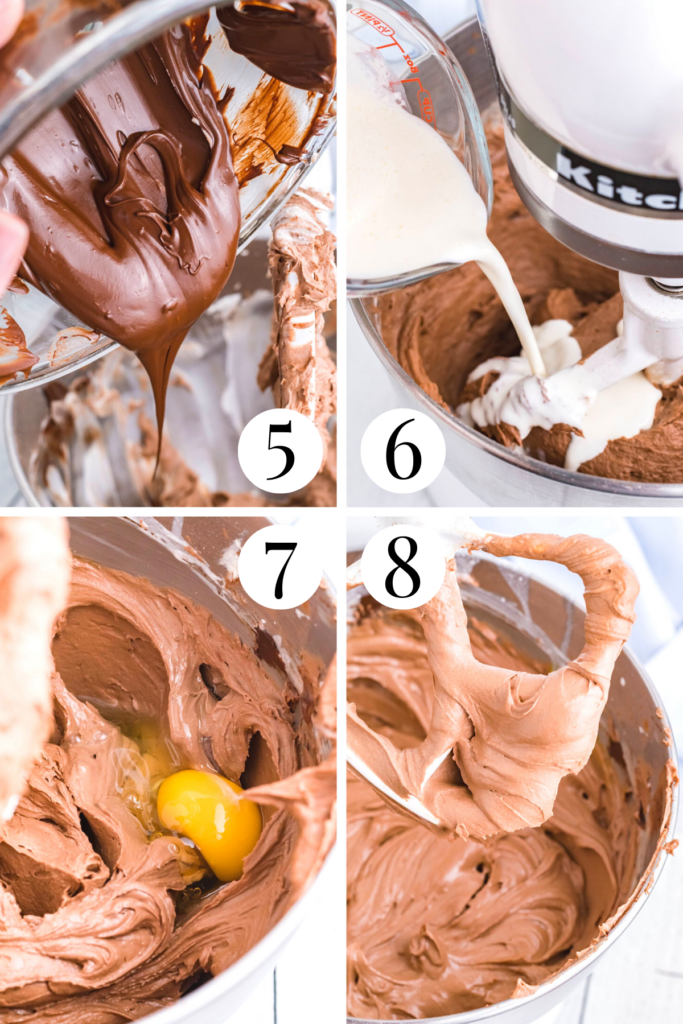
STEP FIVE: Add in the melted chocolate, heavy whipping cream, and mint extract and mix until just combined. Scrape the sides and bottom of the bowl and mix for an additional minute.
STEP SIX: Add the eggs in last, and mix as little as possible to completely combine the eggs.
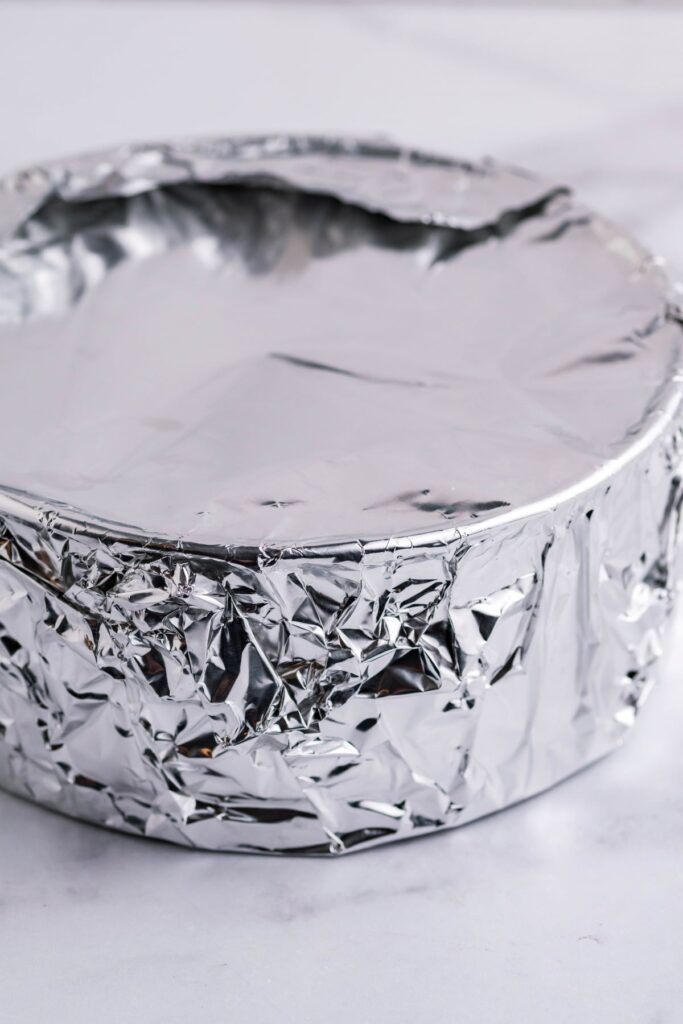
STEP SEVEN: Pour the batter into the prepared crust and gently tap the springform on the counter to remove any air bubbles. Then cover the springform completely (top and bottom) in aluminum foil to keep as much moisture out as possible.
STEP EIGHT: Add one cup of water and a trivet into the bottom of your Instant Pot and place the cheesecake on top. Close and seal the top and set to manual pressure for 50 minutes with a 10 minute natural release.
NOTE: THE CHEESECAKE MAY LOOK A LITTLE UNDERCOOKED WHEN YOU REMOVE IT FROM THE INSTANT POT. THAT IS OKAY! ONCE THE CHEESECAKE COOLS IT WILL SET. IT SHOULD LOOK LIKE JELLO BUT NOT WATER, IF YOU FEEL LIKE YOU NEED TO COOK IT LONGER, COOK FOR 10 MORE MINUTES BUT NOT LONGER.
STEP NINE: Remove from the Instant Pot and immediately remove the aluminum foil and allow the cheesecake to cool to room temperature. Then transfer to the refrigerator overnight.
FAQ’S
MY CHEESECAKE DOESN’T LOOK COOKED WHEN I TAKE IT OUT OF THE INSTANT POT
That is okay! The cheesecake will look a little undercooked when you first remove it from the pot. As it cools it will begin to thicken and set. If you think that it is too undercooked, I would recommend adding it back into the Instant Pot for about five minutes, but not much longer than that.
DO I COVER THE ENTIRE SPRINGFORM IN ALUMINUM FOIL?
Yes. I like to use one large piece of foil that overlaps to keep any moisture out. I have had readers tell me that they also use a paper towel under the foil and it seems to work well for them.
DO I REMOVE THE ALUMINUM FOIL RIGHT AFTER REMOVING THE CHEESECAKE FROM THE INSTANT POT?
Yes, remove the foil as soon as it is cool enough for you to touch it. Also, leave it uncovered in the refrigerator overnight as well.
MORE INSTANT POT CHEESECAKE RECIPES YOU WILL LOVE!
INSTANT POT NEW YORK CHEESECAKE
INSTANT POT CHOCOLATE CRUNCH CHEESECAKE
INSTANT POT STRAWBERRY CRUNCH CHEESECAKE
INSTANT POT BLUEBERRY SWIRL CHEESECAKE

If you love this INSTANT POT MINT CHOCOLATE CHEESECAKE as much as I do, make sure you share it with your friends on Facebook and Pinterest so they can make it too!

Instant Pot Chocolate Mint Cheesecake
Ingredients
Crust
- 1 1/4 cups Oreo cookie crumbs
- 3 Tablespoons butter melted
Filling
- 24 oz. cream cheese room temperature
- ¾ cup granulated sugar
- 3 Tablespoons flour
- ⅓ cup unsweetened cocoa powder
- 6 oz. semi-sweet chocolate melted and slightly cooled
- 1 teaspoon mint extract
- ½ cup heavy whipping cream
- 2 eggs
Ganache:
- 1/2 cup semi-sweet chocolate chopped
- 1/4 cup heavy whipping cream
Whipped Cream:
- 1 cup heavy whipping cream cold
- 1/2 cup powdered sugar
- 1/3 cup unsweetened cocoa powder
- 1 teaspoon vanilla extract
Instructions
Crust
- Preheat your oven to 350 degrees F.
- Add Oreos to a food processor until you get about 1 1/4 cups of crumbs. Add in the melted butter and pulse until combined.
- Pour into the bottom of a greased 7″ springform pan and use your hand or the back of a spoon to press and form a crust bringing the crumbs up about 1 inch on the sides.
- Bake the crust for 10 minutes. Remove and cool on a wire rack.
- You can also freeze the crust until you prepare the filling for a bake free method.
Filling
- In the bowl of a stand mixer (or use a hand mixer) with a paddle attachment, cream the cream cheese for 3-4 minutes or until completely smooth and there are no lumps.
- Add in the sugar and flour and mix until just combined.
- Add in the cocoa powder and mint extract and mix until just combined. Scrape the sides and bottom of bowl.
- Slowly pour in the melted chocolate and mix on low speed until combined. Scrape the sides and bottom of the bowl.
- Pour in the heavy whipping cream and mix on low speed until combined then increase the speed to high for about 1 minute.
- Scrape the sides and bottom of the bowl and make sure there are no lumps. Give one final mix before adding the eggs.
- Add the eggs one at a time and mix just until the yolk disappears into the batter.
- Pour the batter into the prepared crust and gently tap the bottom of the pan on the counter to release any air bubbles.
- Cover the pan completely with aluminum foil and add one cup of water into the inner pot of your Instant Pot and add in the trivet.
- Place the cheesecake on top of the trivet and set your pot to high pressure for 50 minutes and allow to naturally release for 10 minutes.
- Once you can open the pot, remove the cheesecake and allow to cool to room temperature on a wire rack.
- Place the cheesecake in the refrigerator to set for at least 6 hours but overnight is recommended.
To make the ganache:
- Prepare the ganache by adding the heavy cream into a microwave safe bowl and heat for about 30 seconds until hot but not boiling. Add the chocolate in and allow to sit for 2-3 minutes, then whisk until smooth.
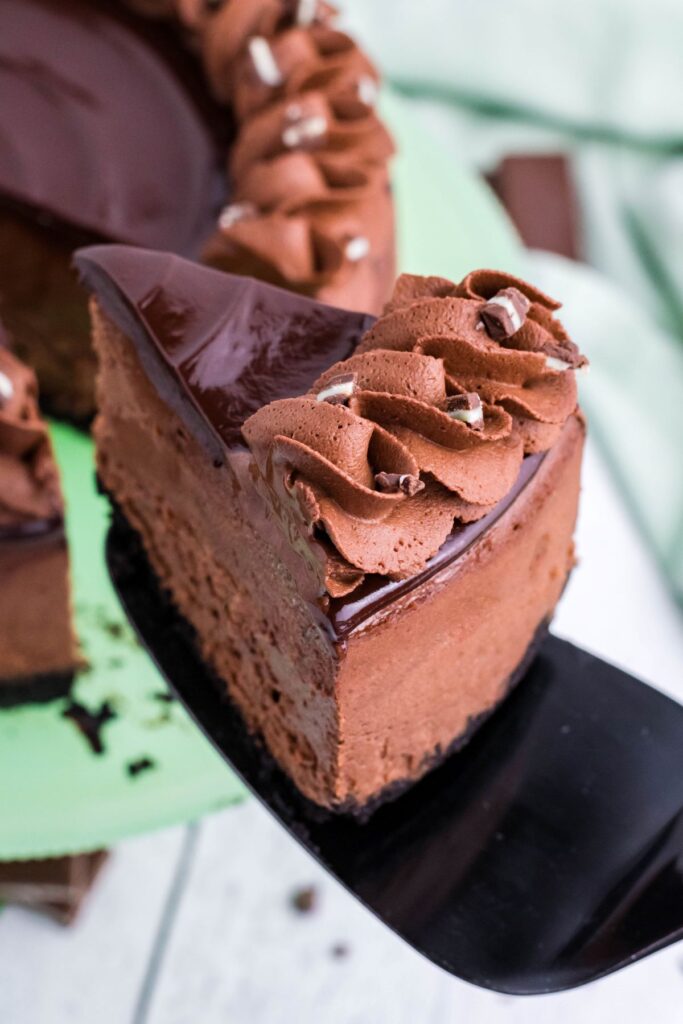
- Remove the cheesecake from the refrigerator and remove the outer ring. Pour the ganache over the top of the cheesecake and smooth.
To make the whipped cream:
- Add the heavy whipping cream, powdered sugar, cocoa powder, and vanilla into the bowl of a stand mixer equipped with a whisk attachment. Whisk on high speed until stiff peaks form.
- Add the whipped cream into a piping bag equipped with a large star attachment and swirl on top of the cheesecake. Top with Andes mint pieces and serve.
- Keep left overs in an air tight container in the refrigerator for up to three days.
Equipment
Did you make this recipe?
Make sure to follow on Pinterest for more recipes!

Leave A Reply!