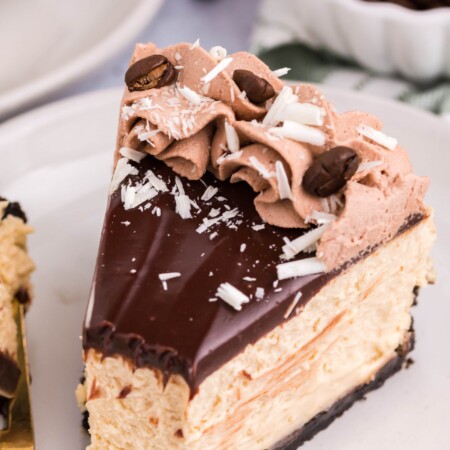
This Instant Pot Baileys Cheesecake has a creamy Baileys and espresso filling, baked on an Oreo crust, and topped off with a decadent chocolate Baileys ganache.

BAKING IN AN INSTANT POT
If you haven’t made cheesecake in the Instant Pot, you are really missing out. I thought the whole idea was crazy when I first heard of it, but once you try that first cheesecake in the Instant Pot, you will never go back.
“Baking” in the Instant Pot is super easy and, in my opinion, it gives the cheesecake an amazing texture. Typically when you bake a cheesecake, you have a water bath to keep the cheesecake from cracking.
Since the inside of the Instant pot is humid, it prevents cracking and just gives the cheesecake an all around creamy texture.
If you haven’t given the Instant Pot a try yet, I 100% recommend this one. We use it almost daily. It is worth every penny and makes life so easy with two hungry boys.

TIPS FOR MAKING AN INSTANT POT BAILEYS CHEESECAKE
I have made several Instant Pot cheesecakes in my time as a food photographer and blogger. So, I know a thing or two about a thing or two, and Instant Pot cheesecakes are definitely one of those things that I would consider myself a pro at.
I am going to fill you in on all the tips and tricks to getting that PERFECT cheesecake the first try.
First things first, the crust. I have had a lot of people ask if the crust is soggy. The short answer is…it CAN be. I have tried several things to keep this from happening, but the one thing that consistently gives me that crunchy crust is baking the crust before adding in the filling. Just pop it in a 350 degree oven for about 10 minutes and it will be perfect.

My second top is the cream cheese. If you are making a cheesecake, PLEASE use high-quality cream cheese. I use Philadelphia. The quality of the cream cheese determines the end result of your cheesecake.
With that, make sure that your cream cheese is at room temperature before you start. This is also important to keep consistency within the filling. If you use cold cream cheese it won’t whip up correctly and you will probably have a lumpy cheesecake.
I ALWAYS cream my cream cheese for a good 5-8 minutes before I ever add anything else. This gives the cream cheese a nice creaminess and just creates a perfect, smooth, base for your cheesecake. Take the extra time, I promise it is worth it.

MY CHEESECAKE LOOKS UNDERCOOKED, WHAT DID I DO WRONG??
This is the most common question I get with my Instant Pot Cheesecakes. When you remove the cheesecake from the Instant Pot it WILL look like it is undercooked. When I bake cheesecakes the traditional way, they look the same when I take them out of the oven.
The sides of the cheesecake should look set, but the center will still have a slight jiggle to it. Just allow the cheesecake to cool completely then place in the refrigerator to set overnight. It will be perfect the next day.
If you add the cheesecake back in the Instant Pot or bake any longer, the cheesecake will actually be overcooked, dry, and crumbly.

VARIATIONS
Cheesecakes are so fun because you can change things up to fit your personal taste. You can change up the toppings or add-ins.
If I made this cheesecake again, I would add mini-chocolate chips in the filling because…why not??
This recipe calls for espresso powder in the filling, you cant find this in the baking isle at your local grocery store, BUT if you don’t have it on hand or cant find it, feel free to replace with actual espresso or strong brewed coffee.

HOW TO GET THE PERFECT SLICE OF CHEESECAKE
I love adding this tip in my posts. This isn’t a huge concern for most people, if you are serving a party, or taking pictures for whatever reason, you will want a perfect slice of cheesecake.
To get the perfect slice, take a large butcher knife, and run it under hot water for 2-3 minutes to warm it up. You can also use a kitchen torch but be careful. Remove any water from the knife and make your first cut into the cheesecake. Run the knife under water to clean, wipe off the excess water, and make your second cut.

EQUIPMENT USED
IF YOU LOVED THIS INSTANT POT BAILEYS CHEESECAKE AS MUCH AS I DO, MAKE SURE YOU SHARE IT WITH YOUR FRIENDS ON FACEBOOK AND PINTEREST SO THEY CAN MAKE IT TOO!
More Instant Pot Cheesecake Recipes
Instant Pot Cinnamon Roll Cheesecake
Instant Pot Chocolate Cheesecake
Instant Pot Nutella Cheesecake
Instant Pot Butterfinger Cheesecake
Instant Pot Chocolate Chip Cheesecake

Instant Pot Baileys Cheesecake
Ingredients
Crust
- 1 1/2 cups Oreo cookie crumbs about 13 cookies
- 4 Tablespoons butter melted
Filling
- 2 8 oz. packages cream cheese softened
- 1/2 cup granulated sugar
- 2 Tablespoons all-purpose flour
- 1 tsp Espresso powder
- 1/4 cup heavy whipping cream
- 1/4 cup Baileys Irish Cream
- 2 eggs
Toppings
- Chocolate Whipped Cream
- 1 cup heavy whipping cream
- 2 Tablespoons unsweetened cocoa powder
- 1/2 cup powdered sugar
Ganache
- 2 Tablespoons heavy whipping cream
- 2 tablespoons Baileys Irish Cream
- 1/2 cup semi-sweeet chocolate chips I recommend Ghirardelli
- Chocolate shavings
Instructions
Crust
- Preheat your oven to 350 degrees/F and prepare a deep 7” springform pan with nonstick spray making sure to spray the sides and set aside.
- Add Oreos to a food processor and pulse until you get about 1 ½ cups of cookie crumbs (about 13-15 cookies)
- Add the melted butter into the food processor and pulse until well combined.
- Pour the cookie crumbs into the springform and use the back of a spoon to gently press and form a crust. Make sure to bring the crust up about an inch up the sides as well.
- Bake the crust for 10 minutes.
Filling:
- In the bowl of a stand mixer equipped with a paddle attachment, add the softened cream cheese and cream on high speed for 5-6 minutes. This is an important step, do not skip it.
- When the cream cheese is light and fluffy and there is no lumps, scrape the sides of the bowl and add the granulated sugar, flour, and espresso powder. Mix for an additional 2-3 minutes.
- At this point, scrape the sides and bottom of the bowl and make sure there are no lumps of cream cheese in the batter, if there is, mix on high speed for a few additional minutes.
- Add in the heavy cream and Baileys and mix on med-high speed for 2-3 minutes.
- With the mixer on low speed, add the eggs in one at a time and mix just until combined. Be careful not to overmix here! As soon as the yolk disappears, stop mixing.
- Scrape the sides and bottom of the bowl and make sure everything is combined and smooth.
- Pour the batter into the prepared crust and gently tap on the counter to remove any air bubbles.
- Cover the springform pan tightly with aluminum foil.
- Prepare your Instant Pot by adding 1 cup of water and a trivet into the inner pot. Place the cheesecake on the trivet and place the lid on sealing.
- Cook on high for 40 minutes and allow a natural release. Once you can open the lid, remove the cheesecake and allow to cool completely on the counter. (If the cheesecake looks undercooked when you take it out, it is OK! It will set up in the fridge)
- Once the cheesecake has cooled to room temperature, place in the refrigerator for at least 6 hours but overnight is best.
Toppings
- Once the cheesecake has set, prepare the whipped cream by adding the whipping cream into the bowl of stand mixer equipped with a whisk attachment and beat on high speed until it starts to thicken.
- Add the cocoa powder and powdered sugar and mix on high speed until you have stiff peaks.
- Prepare the ganache by adding the Baileys and cream to a microwave safe bowl and heat for about 30 seconds or until hot. Pour over the chocolate chips and let sit for 2-3 minutes. Whisk until smooth. Allow to cool slightly.
- Pour the ganache over the cheesecake and smooth. Add the whipped cream to a piping bag and pipe a circle around the top of the cheesecake and sprinkle with chocolate shavings.
- Keep any left overs in an air tight container in the refrigerator
Did you make this recipe?
Make sure to follow on Pinterest for more recipes!

Comments & Reviews
Where is the espresso?
Thank you so much for the comment. There was a typo in the recipe. It is fixed now 🙂
So sorry about that.
How much espresso powder do you use for the filling? I didn’t see it in the recipe.
Hello!
Thank you for the comment. There was a typo in the recipe. It has been fixed now. So sorry about that.
Since you are an experienced cake maker do you have a recipe or know how to make a dense cheesecake vs a creamy one?
Thank you.
Thank you so much for your question!
I personally prefer a creamy cheesecake. I don’t think I have ever made a dense cheesecake? I’m sorry I can’t be of more help. I would recommend searching on Pinterest or Google for a recipe 🙂
Can you freeze this? Also the recipe is for spring form pan. How would you convert it to the egg bite mold?
I would freeze before putting any of the toppings on it and make sure to cover it well to prevent freezer burn.
I’m honestly not sure about the egg bite molds. I don’t want to tell you wrong.
If you try it let me know!
Cab the espresso be left out?
Yes, you can leave the espresso powder or add less than what the recipe calls for.
For the foil , do you wrap the entire pan (bottom and top in the foil ?
Hi Robin!
Yes,I wrap top and bottom in foil.
This cheesecake is divine like the Cheesecake Factory ones, but I followed this recipe to a T, and the sides were cooked, but the middle was mush. The instructions said it would look under cooked and set in the fridge, so I chilled on my counter and placed in my fridge over night, and after I did the ganache and cream the next afternoon, I cut into it and was disappointed, I still ate it and that’s why I know it’s delicious… but I’d recommend adding an additional 5-8 minutes to make sure the center sets properly. I’m going to remake it tomorrow and try adding extra time to the IP, even though the recipe says not to.
I’m so sorry about that! Did you use a 7 or 6 inch pan? If you used a 6 inch that may explain it. Most of my notes I try to include that if you use a smaller pan to add a few more minutes since the cake will be thicker overall.
Hope that helps!Thank you for the comment.